Wood Selection
Selecting wood for the spindle and baseboard is one of the most critical aspects of bow drill friction fire making. Both components should be the same type of wood or at least different woods of approximately the same hardness. In general, select a dead branch of wood that’s very dry but not rotten.
Trial and error will be your best teacher in wood selection. The more you practice, the better at finding the correct wood you’ll be. Lantana is a great wood to use as it works great and is an invasive species that needs removing.

Spindle
The spindle is a smooth piece of wood that spins in the bow to create an ember. When you are making your spindle, the straighter the wood you use, the better. If you struggle to find a smooth straight piece, you can whittle it down to reduce the curve.

The spindle is an essential part of the bow drill friction fire kit. So take care and time in finding the best wood. The top should be shaped into a small point to reduce friction in your hand but made into a larger diameter at the bottom to maximise friction on the baseboard.

Baseboard
The baseboard for your bow drill friction fire should be about half an inch thick. Most likely, you’ll have to use a knife to shape your board. A nice flat surface on the top and bottom will help keep the board still on the ground and help you start your notch on top.


Bearing Block
The bearing block is the object that fits in your hand and holds the drill in place. I prefer to use rocks as they last a long time. But you could also use a bit of hardwood or a shell.
You can be creative with the bearing blocks as long as it holds the wood and doesn’t burn your hand. Be careful with what you do use though, the friction gets extremely hot and can burn your hand.


Bow
A slightly curved branch of dense wood, roughly 1-2 feet long, will work great as the bow for your bow drill friction fire kit. I find the longer, the better. Find a string that doesn’t slip on the spindle once tightened. You can make natural cordage strings, but it’s best to use a durable string or shoelace in the learning stages.

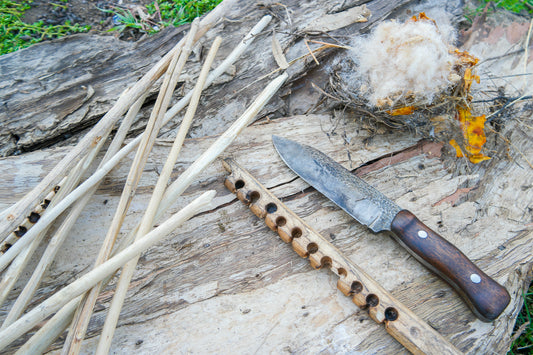
Birds Nest
A lot of creativity can go into making a suitable nest. Use lighter, dryer fine material for the inner nest like fine dry grass or palm husk. Use more stringy, dry grass or bark for the outer nest. Take lots of time to make a good fire nest; it’s one half of making a fire.


Burning in the Socket
Now that you have your kit assembled. Grab a sharp knife and twist in a starting hole to place your spindle. Next, twist your spindle into your bowstring. This process can be a tricky task at first. It should feel like it wants to flip out of the string.
Place one foot on the baseboard to hold it still, and don’t worry, it may take some time to master the correct form. Motion the bow back and forwards, making the spindle spin in the notch till you see both wood parts marrying together and creating dust.


The Notch
Cut the notch from the edge of the fire board just off the centre of the socket. It should be a wedge-shaped slice through the entire thickness of the board. Use your knife to cut this out and make it as smooth and clean as possible.


Starting the Bow Drill Friction Fire
I like to place a leaf or piece of bark under my baseboard to catch the ember; this will also help if the ground is damp. Next, place the spindle in the socket and start slow motioning the bow.
You can start slow as you are first creating dust. Then, as you see dust forming in the notch, you’ll notice smoke beginning to form. When you see smoke, you can start to speed up.

Keep going fast until you see heaps of smoke, and you should start to see smoke coming from the dust. You’ll notice the dust also beginning to burn and change colour. The speed and pressure you use will depend on the wood you are using. Eg. softer force for a softer wood.
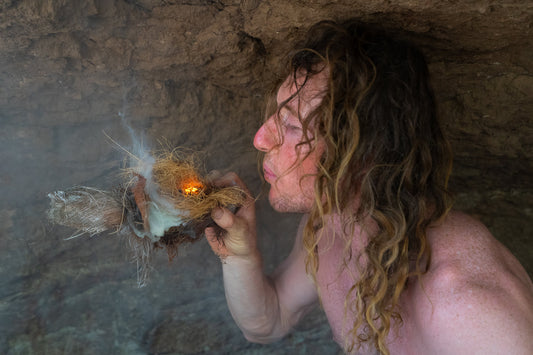
Once you have a nice glowing ember, place it in the nest. Pinch the nest together and lightly blow on and angle at the ember. Turn your head away and take breathes of clean air. You’ll get teary eyes and have coughing fits very quickly if you inhale the smoke.


As the ember gets hotter and grows, you can blow harder. Finally, after a few hard breaths, the ember will catch fire.

Enjoy the Moment
I can’t think of a more incredible experience than making a friction fire. Don’t be deterred if you don’t get it the first few tries. Keep practising, and you will. It’s not an easy skill to master – your first fire is one to celebrate!

Barefoot Bush Experiences
Adam runs bushcraft workshops and rugged adventures for those keen to learn how to thrive in wild places just with the basics. Follow his personal adventures on Instagram and visit his website to get in touch.